- #learning
- #blog
- #astro

Introduction
I was bored on 7th December and checked out the blog of Svelte to see whether the long awaited version 5 had been released. It hadn’t. I turned to the Astro blog to see what was new there and, blow me sideways, there was a new version (4.0) dated that very day. I had to give it a whirl and built this blog with it.
It has taken 2 months to deploy it because a blog is not a blog without content. Spoiler alert: the dev experience is excellent with Astro. Here is how I did it.
My requirements
I wanted to achieve:
- The ability to write blog posts in markdown instead of HTML.
- Create a simple blog site.
- Achieve high Lighthouse scores.
- Use traditional on-page SEO techniques.
- Manage the site directly from VS Code and not use a web host control panel.
My approach
I had previously refactored a website with Astro 3.5 with its new ViewTransitions and Image APIs. The useful Astro blog tutorial had not caught up at that stage but now it has and the documentation for v4.0 is excellent.
Project setup
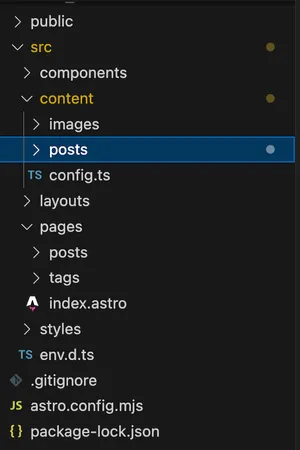
In additon to the ‘out of the box’ Astro file/folder structure, I added a folder called content and within it added two more for posts and images. The content folder is crucial to use Astro’s Collections API. The posts folder is used to house the .md and .mdx files for the blog. Blog images were placed in the images folder. The Astro docs recommends storing images somewhere in the src folder “so that Astro can transform, optimize and bundle them”.

On this website I wanted a home page showing the blog posts; a tag cloud associated with the posts that when clicked would filter posts with that tag; and dynamic routing to each post.
Defining the blog collection
The content folder needs a config.ts file to define the collection. Based on the frontmatter for each blog post, my collection was define like so:
import { z, defineCollection } from "astro:content";

const postsCollection = defineCollection({
 type: 'content',
 schema: z.object({
  title: z.string(),
  date: z.date(),
  description: z.string(),
  image: z.object({
   url: z.string(),
   alt: z.string()
  }),
  tags: z.array(z.string())
 })
});

export const collections = {
  posts: postsCollection
};
Installing MDX
I wanted to use .mdx files becuase these would allow Astro components to be embedded within the markdown. The installation of MDX was was simple, using the following terminal commands. Then, MDX is automatically added to the integrations in astro.config file.
npx astro add mdx
// then, of course, spinning up the dev environment with
npm run dev
Markdown files
Each markdown file (.md or .mdx) must now have frontmatter that matches the types set in the collection schema. If not the site will crash.
---
title: Building a blog with Astro version 4.0
description: Developer notes on building a blog site with Astro v4.0
date: 2023-12-07
image:
 url: '/src/content/images/bored-fish-gabor.jpg'
 alt: 'a bored fish'
tags: ['learning', 'blog', 'astro']
---
Astro pages
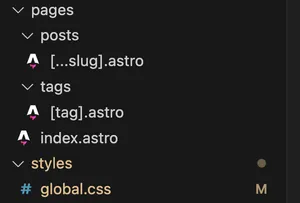
Notice here how the pages folder is organised. The index file represents the home page.
In order to create dynamic routing for each blog post, the posts folder contains a […slug].astro file. It must have the square bracket notation and three dots for it to work properly. To create the tag cloud a tag folder contains a [tag].astro file. Let us look at the code within each of these files.

Dynamic routing with […slug]
Notice that the getCollection function is used to grab the data from the .md and .mdx files within the content/posts folder.
The […slug].astro file
---
import { getCollection } from 'astro:content';
import BlogLayout from '../../layouts/BlogLayout.astro';
export async function getStaticPaths() {
 const blogEntries = await getCollection('posts');
 return blogEntries.map((entry) => ({
  params: { slug: entry.slug },
  props: { entry },
 }));
}
const { entry } = Astro.props;
const { Content } = await entry.render();
---

<BlogLayout frontmatter={entry.data}>
 <Content />
</BlogLayout>
Tag cloud
Similarly the getCollection method gets the data from content/posts folder. The uniqueTags variable ensures there are no duplicated tags by using Set.
The [tag].astro file
---
import { getCollection } from 'astro:content';
import Layout from '../../layouts/Layout.astro';
import BlogPost from '../../layouts/BlogPost.astro';

export async function getStaticPaths() {
 const allPosts = await getCollection('posts');
 const uniqueTags = [
  ...new Set(allPosts.map((post) => post.data.tags).flat()),
 ];
 return uniqueTags.map((tag) => {
  const filteredPosts = allPosts.filter((post) =>
   post.data.tags.includes(tag)
  );
 return {
  params: { tag },
  props: { posts: filteredPosts },
  };
 });
}
const { tag } = Astro.params;
const { posts } = Astro.props;
---
Then to display the posts with the associated tag:
The [tag].astro file
<Layout pageTitle={tag}>
 <p>Posts tagged with {tag}</p>
 <ul>
  {
   posts.map((post) => (
    <BlogPost
     url={`/posts/${post.slug}/`}
     title={post.data.title}
     description={post.data.description}
     src={post.data.image.url}
     alt={post.data.image.alt}
    />
   ))
  }
 </ul>
</Layout>
It was here I had a bug and broke the site. It turned out that I had omitted the forward slash at the beginning of the BlogPost url. It took a while to figure that out!!
Finishing touches
Using Image component in MDX
To use the Image API in a .mdx file, Image needs to be imported below the post frontmatter.
import { Image } from 'astro:assets';
import setupImage from "../images/astro-setup.png";
In addition, the image also needs importing becuse the Image src cannot take in a string.
<Image
 src={setupImage}
 alt='astro project setup'
 width='300'
 height='450'
 format='webp'
 loading='lazy'
/>
Customising <pre> colors
I had heard of Shiki that formats <pre> with themes that can be customised. Astro comes with Shiki already onboard, so the configuration was easy enough.
import { defineConfig } from 'astro/config';
import mdx from "@astrojs/mdx";

export default defineConfig({
 integrations: [mdx()],
  markdown: {
   shikiConfig: {
    theme: 'css-variables',
    langs: [],
    wrap: true,
  }
 }
});
With the shiki theme set to css-variables I was able to tweak the colors to match my VS code theme by adding the following styling in my styles/global.css file.
:root {
 --astro-code-color-text: rgb(169, 218,250);
 --astro-code-color-background: rgb(31, 31, 31);
 --astro-code-token-constant: rgb(169, 218, 250);
 --astro-code-token-string: white;
 --astro-code-token-comment: rgb(116, 152, 93);
 --astro-code-token-keyword: rgb(188, 138, 189);
 --astro-code-token-parameter: seashell;
 --astro-code-token-function: rgb(213, 212, 169);
 --astro-code-token-string-expression: rgb(197, 148, 124);
 --astro-code-token-punctuation: linen;
 --astro-code-token-link: honeydew;
}
Deployment
I set up a private GitHub repo to save my files to. Then dithered on where to deploy the site. I just wanted to a way to commit to GitHub and sync the files and the web would do the rest. I found the answer with Vercel. Fortunately there were no other urls called bored fish! Going live was a breeze with automation provided between GitHub and Vercel making for a great dev experience.
Conclusion
When technology changes I usually turn to YouTube to watch a tutorial on how to use it. In this case, the Astro 4.0 version was shipped without prior announcement and no videos existed. I turned purely to the Astro documentation which has been written very well. Thanks, Astro!
Thank you for stumbling across this website and for reading my blog post entitled Building a blog with Astro.