- #javaScript
- #game

Introduction
Coding games is a great way to learn web development and hone your problem solving skills. The Tetris game is one of the more tricky games to create and deserves writing about. This article will not provide all the code, instead it will talk to the concepts of creating the game logic. Hopefully you will find something of interest.
First let us take a look at the seemingly simplicity of the game.
How Tetris works
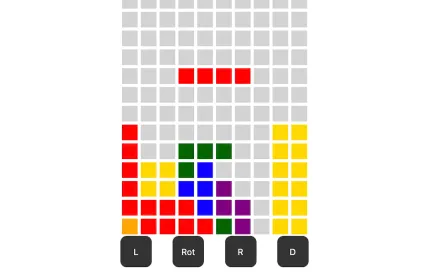
The image shows part of a Tetris board in play. The whole board comprises 20 rows and 10 columns. The current shape (4 red cells) falls to the bottom of the board at a given speed.
When the falling shape hits the bottom row, it will stop falling and remain in place. Another shape, selected at random, will appear at the top and also fall down.
As the shape falls, the player can move it left, right, or rotate it. The aim is to fill the rows with coloured cells. Completely filled rows will disappear and the coloured cells above will appear to drop down.
Filled rows attract a score that depends on the number of simultaneous filled rows and the current game level. The game level changes after 10 rows have been filled. When the game level changes the fall-speed increases, making the game more tricky for the player.
If a previous shape is directly below the falling shape, the fall stops and the falling shape will rest on the shape below. If the player moves left or right, the shape will not move if there is a previous shape in the way or it is on the side of the board. The shape cannot be rotated if it has no room to rotate.
Finally, the game is lost when the colored cells are so high up the board there is no room for a new shape to fall.
How to eat an elephant?
Hopefully that is enough to get your logic juices flowing! 🤣 It also represents a lot of coding and attention to detail. Such complexity should be approached as a challenge and you should not be daunted by it. My article will follow the problem of ‘How to eat an elephant?’ ~ one bit at a time. Here goes …
Creating the game board
A game board will display the game to the user. It needs 200 elements displayed in 20 rows of 10. It is important that each element has a unique id identifier with the values as follows:
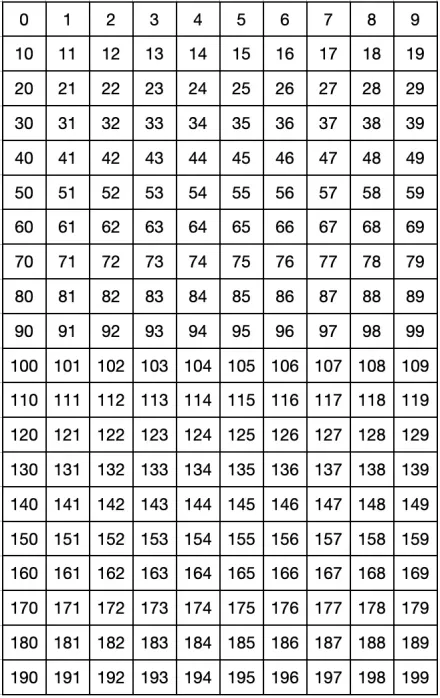
The simplest way to do this is to create a single div and control it’s width with CSS. Below I gave my div an id of ‘ips’, short for international playing surface 🤣. A style is created for the squares (.cell) with a width and height a tenth of the ips width. You can add more styling if you wish. If you add a border or a margin, you will need to adjust the widths accordingly.
<div id="ips"></div>#ips {
width: 240px;
display: flex;
flex-wrap: wrap;
}
.cell {
width: 24px;
height: 24px;
}The game display will be created with JavaScript after the data that controls the game is complete. In the meantime a key-value pair in my new ui object links to the HTML div with the id ips.
const ui = {
 ips: document.getElementById('ips'),
}
Preparing the game data
Before starting, the game data needs some consideration. It should be as simple as possible and memorable so you don’t get lost in the code. I usually create an object called data and keep the app’s information within it. The data.game array will store the information relating to every square, or cell, on the board.
const data = {
 game: []
}
During the game the behaviour of each cell depends on 4 pieces of information:
- Its position on the board
- A colour
- The row it is in
- Whether it contains a previous shape or not
A loop can create 200 lines of data representing every cell. In this case a for loop is used and the push method adds each cell’s data to the data.game array.
function createGameArray() {
 for (let i = 0; i < 200; i++) {
  data.game.push({id: i, color: '', row: 0, stop: false})
 }
}
The resulting array contents looks like this, notice that each line has a unique id that corresponds to its position on the board. The data.color strings are empty for now and the data.stop values are all false.
const data = {
 game: [
  { id: 1, color: '', row: 0, stop: false },
  { id: 2, color: '', row: 0, stop: false },
  // and so on
  { id: 198, color: '', row: 0, stop: false },
  { id: 199, color: '', row: 0, stop: false }
 ]
}
At this stage we don’t have the detail of which row a cell is on. To achieve this the data.game array needs to be looped to add the row data. A forEach method is uded this time to iterate over each line of data. I used a bunch of conditional statements to check the element’s id value and then add the row value accordingly.
data.game.forEach(el => {
 if (el.id < 10) { el.row = 0 }
 if (el.id >= 10 && el.id < 20) { el.row = 1 }
 // and so on
 if (el.id >= 190 && el.id < 200) { el.row = 19 }
})
With hindsight, a nested for loop would probably use less lines of code to accomplish this. Whichever way, the data.game elements now have a row value, like so:
const data = {
 game: [
 //
 { id: 11, color: '', row: 1, stop: false },
 { id: 12, color: '', row: 1, stop: false },
 // and so on to the last row
 { id: 198, color: '', row: 19, stop: false },
 { id: 199, color: '', row: 19, stop: false }
 ]
}
Displaying the game
The completed data.game array can now be used to create the game in the browser. My displayBoard function initially clears the HTML div of any content.
The for loop iterates every line in data.game adding id values to the HTML id value for each cell.
function displayBoard() {
 ui.ips.innerHTML = ''
 for (let i = 0; i < data.game.length; i++) {
  const cell = document.createElement('div')
  cell.classList.add('cell')
  cell.id = data.game[i].id
  cell.textContent = ``
  if (data.game[i].color === '') {
   cell.style.backgroundColor = `#e6e6e6`
  }
  ui.ips.appendChild(cell)
 }
}
These values are crucial to the game and will be used to navigate the falling shape around the board! Next let us look at creating the shapes.
Making tetris shapes
There are 6 shapes each with 4 cells. A line, a square, a T, an S, a Z, an L and a reverse-L shape. In the section ‘How Tetris works’ you saw that the player can rotate the shapes. So how can this be translated into code?
Create a new key-value pair in the data object. The value of currentPosn is initially set to 4 and determines where the shape will be seen on the board. It is this value that will change dynamically as the shape moves down, left or right.
const data = {
 game: []
 currentPosn: 4,
}
The image represents the line shape at a start position of 4 (data.currentPosn). Later in our code, we will add 10 to this value each time the shape is to fall to the next row.
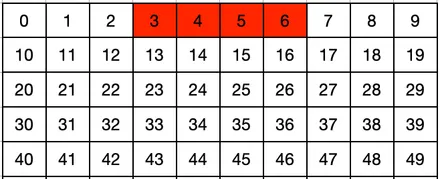
Think how this line of red cells could be coded as an array of values which, when added to the data.currentPosn, would show on board. In this instance, the 4 elements of the line shape can be described by the following array values:
[-1, 0, 1, 2]
// add 4 to each
// 3, 4, 5, 6
The 0 value is the shape’s rotation point and 3 more arrays are required to describe the same shape rotated once, rotated twice and rotated three times. My solution was a nested array, length 4.
[ // Line shape
[-1, 0, 1, 2], // start
[-10, 0, 10, 20], // rotated once
[-2, -1, 0, 1], // rotated twice
[-20, -10, 0, 10] // rotated three times
]
The elements of the first array, at index 0, [-1, 0, 1, 2] describe [the cell to the left, the rotation point, the cell to the right, the cell 2 spaces to the right]. The elements in the second array, at index 1, [-10, 0, 10, 20] describe [the cell above, the rotation point, the cell below, the cell 2 spaces below].
Repeat this concept for all the shapes that can be found at Tetromino on Wikipedia
I created an overarching array called shapes and nested all the shape arrays in it. You will see that the last variable determines the color of the shape in the game.
const shapes = [
 [[-1, 0, 1, 2], [-10, 0, 10, 20], [-2, -1, 0, 1], [-20, -10, 0, 10], 'red'], // Line shape
 [[0, 1, 2, 11], [0, 1, 11, -9], [0, 1, 2, -9], [1, 2, 11, -9], '#009432'], // T shape
 // square, S, Z, L and reverse L to be added
]
Nesting the shapes like this allows us to dynamically change the shape and its rotation. For example shapes[0] produces the line shape whereas shapes[1] produces the T shape. shapes[1][0] is the initial T shape and shapes[1][1] is the T shape rotated once and shapes[1][2] is the T shape rotated twice, etcetera. We will create 2 more variables to control the shape and rotation.
Current shape and rotation
Two more key-value pairs are added to the data object.
- currentShape determines the shape in use
- rotation will control the shape’s aspect on the board
const data = {
 game: [],
 currentPosn: 4,
 currentShape: 0, // new
 rotation: 0, // new
}
The currentShape value will change to a random number when a new shape is required. The rotation value will increase by 1 when the player clicks a button or presses a key.
These changeable values can now be used with the shapes array to display the current shape in its rotation state.
shapes[data.currentShape][data.rotation]
// shapes[0][0]
In order to keep the code tidy I created another object called tetris and added two key-value pairs called falling and currentColor
const tetris = {
  falling: [...shapes[data.currentShape][data.rotation]],
  currentColor: shapes[data.currentShape][shapes[data.currentShape].length - 1]
}
This translates to the current falling shape is shapes[0][0]. If the player rotates the shape the falling shape becomes shapes[0][1], then shapes[0][2] and so on. The rotateShape function will need to reset the rotation variable back to zero, otherwise an error will occur.
if (data.rotation === 3) {
 data.rotation = 0
 } else {
  data.rotation++
 }
At last we have dynamic falling shape data. We can now create a function to display it. The displayFallingShape function loops through the 4 elements of the shape, adds the element value to data.currentPosn. The HTML elements the corresponding id are styled with the background-color set in the shapes array.
function displayFallingShape() {
 tetris.falling.forEach(i => {
  document.getElementById(i + data.currentPosn).style.backgroundColor = tetris.currentColor
 })
}
Moving the shape
Going down
Moving the shape down the board is a crucial element of the game! The start position is set at 4 in the data object, data.currentPosn and the image below shows the line shape, shapes[0][0].

To move the shape down, 10 must be added to the data.currentPosn value because the id of the shape below is 14, then 24, the 34 and so on to the bottom row.
function downOne() {
 data.currentPosn += 10
}Note: To move a shape to the left use -= 1 and to the right use += 1
Beware of ghosts
However, there is a problem.
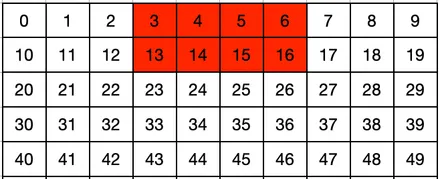
The cells above the shape fell are still coloured red and we do not want this. A function is required to find the cells above then change their color value. Within the clearShapeAbove function I created an array ghost to capture the ghost of the fallen shape (-10).
function clearShapeAbove() {
 let ghost = []
 tetris.falling.forEach(i => ghost.push(i - 10))
 clearShape(ghost)
}
The forEach method loops the falling shape and pushes the ghost cells above (-10) into the ghost array. Then the ghost array is passed as an argument into the clearShape function, which acts the same way as the displayFallingShape function but colours in the ghost to your default cell color.
function clearShape(arr) {
 arr.forEach(i => {
 document.getElementById(i + data.currentPosn).style.backgroundColor = '#e6e6e6'
 })
}
This clearShape array can be used many times, clearing ghosts from down, left, right or rotate movements.
Watch out below!
The bottom line
When the falling shape reaches the bottom row, it must stop falling and remain where it is. How on earth can we do this?
When the shape falls we need to capture it’s id values. In the checkBottomRow function, the currentShape array does just that. The some method returns true if any of the currentShape elements match the bottom row numbers 190 to 199.
function checkBottomRow() {
 let currentShape = []
 tetris.falling.forEach(i => {
  currentShape.push(i + data.currentPosn)
 })
 // if the falling shape is on the bottom row
 if (currentShape.some(n => n >= 190 && n =< 199)) {
  // do some things
  addStopPosnToGame()
 } else {
  return
 }
}
Here is an example of shape[0][1] reaching the bottom. The currentShape.some() method will return true because 195 is between 190 and 199.
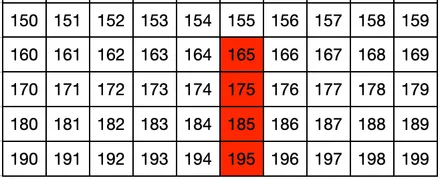
Remember that the data.game array holds the secret to what is shown on the screen. The data.game.stop value is a true or false boolean. We can now use this to our advantage. The addStopPosnToGame function is called if any element of the shape is on the bottom row. The function updates the data.game elements with .stop and .color values.
function addStopPosnToGame() {
 tetris.falling.forEach(i => {
  data.game[i + data.currentPosn].stop = true
  data.game[i + data.currentPosn].color = tetris.currentColor
 })
}
In the above example the addStopPosnToGame function will change the data.game values to:
const data = {
 game: [
 // ...
 { id: 165, color: 'red', row: 16, stop: true },
 // ...
 { id: 175, color: 'red', row: 17, stop: true },
 // ...
 { id: 185, color: 'red', row: 18, stop: true },
 // ...
 { id: 195, color: 'red', row: 19, stop: true },
 // ...
 ]
}
Previous shape below the falling shape
Looking back at how the game works, if a previous shape is directly below the falling shape, the fall must stop and the shape will rest on the one below.
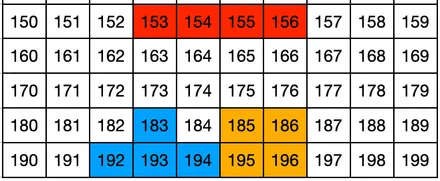
Unlike the bottom row, a previous shape could be anywhere on the board. This presents a challenge but we are already prepared! 🤓 The addStopPosnToGame function added .stop = true values to previous shapes.
In the data object, create a new withStop key with an empty array value. This important array will hold all the id values of the cells marked stop === true.
const data = {
 game: [],
 currentPosn: 4,
 currentShape: 0,
 rotation: 0,
 withStop: [] // new
}
The updateStopCells function initially empties the array before looping the data.game array pushing any element with a truthy stop value to the withStop array.
function updateStopCells() {
 data.withStop = []
 data.game.forEach(el => {
  if (el.stop) { data.withStop.push(el.id) }
 })
}
In the example shown, the data.withStop array would be:
[183, 185, 186, 192, 193, 194, 195, 196]This data is extremely useful. Not just when a shape is moving down but also left, right and rotating. With this in mind I created more objects as boolean ‘switches’ to check whether the player can go down, left, right or rotate.
const can = {
  GoLeft: true,
  GoRight: true,
  GoDown: true,
  Rotate: true
}
These booleans can now act as go / no go switches!
The checkStopsBelow function is to be called whenever the shape is to move down. The function:
- checks that every element in the falling shape is not on the bottom row.
- if not, a cellsBelow array is created.
- tetris.falling is looped to push the id of the cells below (+10) into the cellsBelow array.
- the stopMatch array is dynamically created by the filter method that adds values that match in data.withStop and cellsBelow.
- a stopMatch array length greater than 0 means that there is a shape below and can.GoDown value is set to false.
- a stopMatch array length of 0 means that there is no shape below and can.GoDown value is set to true.
function checkStopsBelow() {
const notBottom = n => n < 190

if (tetris.falling.every(notBottom)) {
 let cellsBelow = []
 tetris.falling.forEach(i => {
  cellsBelow.push(i + data.currentPosn + 10)
 })

 let stopMatch = cellsBelow.filter((el) => data.withStop.indexOf(el) !== -1)

 if (stopMatch.length > 0) {
  can.GoDown = false
    addStopPosnToGame()
    updateStopCells()
  // perform other functions
 } else {
  can.GoDown = true
 }
} else {
 return
}
}
Now go back to the orginal downOne function and add the conditional statement, like so:
function downOne() {
 if (can.GoDown) data.currentPosn += 10
}
Going left or right and rotating
The same concepts can be applied to moving a shape to the left or right and rotation. There is however another thing to consider. The shape must stop if it touches the side of the board. Furthermore, the shape cannot rotate at the side if it does have the room to do so!

Consider the data behind the board and how each side could be defined. The modulo (%) feature can be used for both. It returns the remainder of a calculation If an element’s id modulo 10 is 0, eg. 20 / 10 = 2 remainder 0, then that element is on the left hand side of the board. If an element’s id modulo 10 is 9 eg. 29 / 10 = 2 remainder 9, it is on the right hand side. The can.GoLeft and can.GoRight booleans can be updated accordingly.
Full rows and scores
If you got this far, congratulations! Thanks for staying with me.
From the ‘How Tetris Works’ section, completely filled rows will disappear and the coloured cells above will drop down. I tried numerous attempts at this and finally came up with a solution.
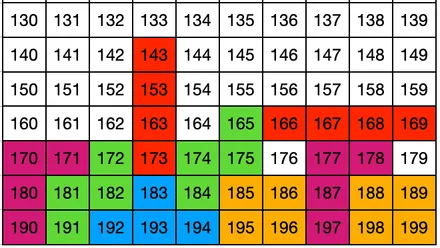
Rows 18 and 19 have been filled by shapes and each of these elements in the data.game array will all have the value of stop: true. In rows 16 and 17 only some elements with have truthy stop values. Creating an array of full rows in our data object will be useful at this stage.
Therefore the every method will be useful here. The checkForFullRows function first creates an empty rows array and pushes 20 empty nested arrays (one for each row). The .stop values are pushed to the nested array depending on their .row value. Then the every method checks each row for all truthy elements.
function checkForFullRows() {
 let rows = []
 for (let j = 0; j < 20; j++) {
  rows.push([])
 }

 data.game.forEach(el => {
  rows[el.row].push(el.stop)
 })

 const full = t => t === true
 for (let i = 0; i < 20; i++) {
  if (rows[i].every(full)) {
   data.fullRows.push(i)
  }
 }
 // do something
}
The next steps depend upon whether data.fullRows.length is greater than 0. Don’t forget that the heart of this particular game is the data.game array. If the number of full rows and the first element containing a truthy .stop can be identified, the array can be looped backwards to ‘drop’ the stop and color values to the end of the array.
The scoring and game levels also depends on how many rows are cleared simultaneously. You might wish to wiki the subject of tetris to find such detail. Of course you will need start- and end-game criteria.
I hope you have learned something about coding in general, coding the tetris game, and thinking about JavaScript logic. Finally, find the link to my Tetris-esque game, Tutr.
Thank you for stumbling across this website and for reading my blog post entitled Coding Tetris with vanilla JavaScript.