- #javaScript
- #Svelte 5
- #runes

Creating a CRUD application with Svelte 5
If you are a developer, you have no doubt been eagerly awaiting the release of Svelte 5. At the time of writing its status remains as release candidate. Check here to see Is Svelte 5 ready yet?. In the meantime, the Svelte team have allowed developers to learn the ins and outs of Svelte 5 in their Preview playground.
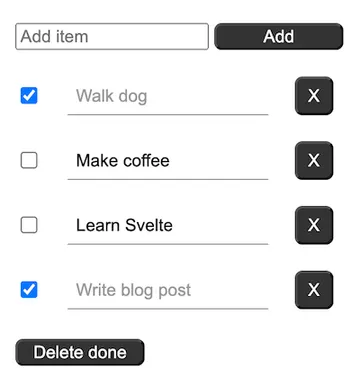
What better way to learn about Svelte’s Runes than to program a ‘To Do List’ that encompasses create, read, update and delete functionality. Here’s a little image of my CRUD app.

Use of runes
To start I used the $state rune to make a reactive array called items. I hard-coded three items so you can see the result in the image above. Another $state rune called itemCount was used for adding an id: to follow-on items. The last $state rune takes in the binded value of the user’s textual input when creating an item. The $inspect rune, logs to the console when there is a change to either the items array or the itemCount variable. This rune is ignored whan the app is finally built.
let items = $state([
  {text: 'Walk dog', done: false, del: false, id: 0 },
  {text: 'Make coffee', done: false, del: false, id: 1 },
  {text: 'Learn Svelte', done: false, del: false, id: 2 },
]);

let itemCount = $state(3)
let userInput = $state('')

$inspect(items, itemCount)
HTML area
In the HTML area, I added a text input with the bind:value linking to the userInput variable. The button calls the addItem function when clicked. If you have worked with Svelte before version 5 you will notice here that onclick replaces on:click.
<input type='text' bind:value={userInput} placeholder='Add item'/>
<button onclick={addItem}>Add</button>
onclick functionality
The addItem function is a regular function within the script tags. If the user has added text content to the input field, the itemCount variable is incremented by one. Then the new item is pushed onto the items array. This was not possible in earlier versions of Svelte. Notice that the text: userInput takes in the binded value above. After the item has been pushed to the array, the userInput is reset to an empty string. This clears the input field of text.
function addItem() {
 if (userInput !== '') {
  itemCount++;
  items.push({text: userInput, done: false, del: false, id: itemCount})
 }
 userInput = ''
}
#each loop
Later in the HTML area, the items array is iterated over using the each loop. Each item creates a itemDiv wrapper, a checkbox that is binded to the item’s item.done boolean. Similiarly the text input is binded to the item.text. This is super useful as any update to an item can be made directly in its own input field. Lastly, a button to delete the item calls the deleteItem function if clicked.
{#each items as item, id}
 <div class='itemDiv'>
  <input class='checker' type='checkbox' bind:checked={item.done}/>
  <input class='item' type='text' bind:value={item.text}/>
  <button class='btn' onclick={() => deleteItem(item.id)}>X</button>
 </div>
{/each}
Notice here that the onclick uses an arrow function. This is because I need to pass in an argument to the deleteItem function.
Delete functionality
The deleteItem function is a regular function that takes in a number (num) as an argument. You can see from the button above that the value of the argument will be the item’s id. The good old for loop provides an i to check the id of each item, and if it equates to the id of the item (num), it will be spliced from the items array. For more information on splicing, see my post called Find element in array and delete it
function deleteItem(num) {
 for (let i = 0; i < items.length; i++) {
  if (items[i].id === num) {
   items.splice(i, 1)
  }
 }
}
Checkboxes
It is worth having another look at the app. I wanted to check off any item that was completed. If so, the text in the associated input field would gray-out. Take a look.

Here is the HTML again for reference purposes. Note that the checkbox with a class of .checker comes before the input field with a class of .item.
<input class='checker' type='checkbox' bind:checked={item.done}/>
<input class='item' type='text' bind:value={item.text}/>
The following CSS makes the text gray if the checkbox is checked.
.checker:checked + .item {
 color: #999;
}
The final element of the CRUD app is a button that deletes all the items that are marked complete (done: true). Here is the HTML:
<button onclick={deleteDone}>Delete done</button>When clicked the deleteDone function is called. Again, this is a regular function within the script block.
function deleteDone() {
 const alldone = items.filter((el) => el.done === false)
 items = alldone
}
The allDone variable filters the items array for those elements not marked complete (done: false). The items array is then overwritten with the filtered allDone array. For more information on the filter( ) method, see my post called Remove an object element from an array
UPDATE: In fact the code above can be shortened further without the need for a seperate variable, like so:
function deleteDone() {
 items = items.filter((el) => el.done === false)
}
And that’s it, the app is complete!
Thank you for stumbling across this website and for reading my blog post entitled Making a CRUD app with Svelte 5.