- #javaScript
- #arrays
- #game

Introduction
I often like to code classic games from first principles, a blank VS code screen and zero frameworks. Call it ‘back to basics’. I have coded the 2048 before but I thought it would make a good topic for a blog post especially because there are a lot of concepts used in the process.
The 2048 game
The 2048 game is highly addictive, nearly as addictive as coding it properly. It is based on a 4 by 4 grid. At the beginning of the game there will three number twos somewhere on the grid.
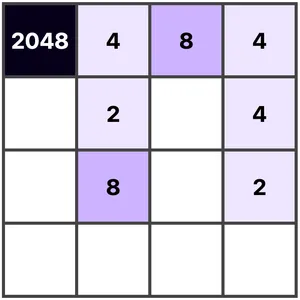
The game is played with the user playing to the left, right, up or down. If adjacent grid squares contain the same number that number will be doubled in the direction of play. For example in the image below, if the player played upward, the two fours in the right hand column would become an eight in the top right corner. Below the eight would be a two.

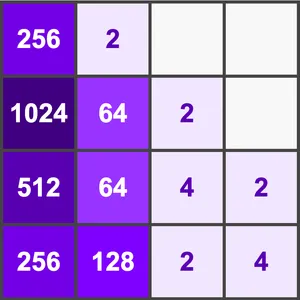
The game is won when the player reaches 2048. Follow the link to my previous version of 2048, not to play necessarily but to think how you would use data for the game. That is the purpose of this post.
According to Wikipedia 2048 ”… was originally written in JavaScript and CSS over a weekend, and released on 9 March 2014 as free and open-source software subject to the MIT License.”
In the last 10 years there have been a lot of enhancements to JavaScript, especially the ES6 version. Therefore, I am sure that the code in this blog post will look a lot different to the orignal.
The HTML
I could not simplify the HTML any more than this.
<body>
  <section id="ips"></section>
  <script src="app.js"></script>
</body>
The 4x4 grid will be placed within the section with the id of ips. That’s my abbreviation for ‘international playing surface’ 😄. Let us not worry about the CSS code just yet because the purpose of this post is to figure out the data and logic behind the game.
Game logic and JavaScript
When I see a game based on a grid I immediately think of a JavaScript array at the heart of the game working.
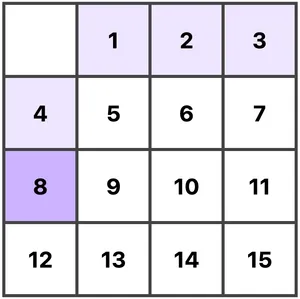
const gameArray = [0, 1, 2, 3, 4, 5, 6, 7, 8, 9, 10, 11, 12, 13, 14, 15];With this in mind the array above the could result in this:

Don’t worry about the colours. My CSS colours-in values less than 8 with pale lilac. Any zeros will not appear. The key point is that the a single array controls what the user sees in the browser.
Game data
I like to store data in a JavaScript object so that it is not accessible in the global scope. My data object looks like this:
const data = {
 game: [0, 0, 0, 2, 0, 0, 0, 0, 0, 0, 2, 0, 2, 0, 0, 0],
 spaces: [],
 rows: [],
 cols: [],
}
Don’t be concerned with the spaces, rows and cols arrays just yet. We will come on to those. Just look at the game array for now.
I also like to create a seperate object for the ui, or user interface. Here only one key value pair is added. Therefore ui.ips links to the HTML section with the ‘ips’ id mentioned above.
const ui = {
 ips: document.getElementById('ips'),
}
Create the grid
My function called showGame initially clears the ui.ips (the 4x4 grid) of any HTML content. Then a for of loop iterates through the data.game array elements:
- a div is created for each element;
- a CSS class of .box is added to each div.
Then, if the data.game element value is greater than zero (> 0) then the number is added to the div, otherwise nothing is added, the grid square will be blank.
Finally, each div is appended as a child element to the HTML section with an id ips.
function showGame() {
 ui.ips.innerHTML = '';

 for (let number of data.game) {
  const div = document.createElement('div')
  div.classList.add('box');

  if (number > 0) {
   div.textContent = number
  } else {
   div.textContent = ''
  }

  ui.ips.appendChild(div)
 }
}
Based on the following initial data.game array
const data = {
 game: [0, 0, 0, 2, 0, 0, 0, 0, 0, 0, 2, 0, 2, 0, 0, 0],
}
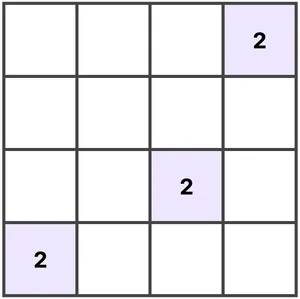
… the following 4x4 grid will be displayed.

The user plays left or right
Look at the image above. How on Earth can we manipulate the data.game array to cope with user’s click left ot right? In my mind, the logical thing to do is to create a nested array of the four rows. We can manipulate each row and afterwards send them back to the data.game array which would change what the user sees in the browser.
Row data
My function called createRowsFromGame initally makes adds 4 empty arrays into data.rows array. These nested arrays are then destructured into rows 0 to 3.
function createRowsFromGame() {

 data.rows = [[], [], [], []]; // reset
 const [row0, row1, row2, row3] = data.rows;

}
A for loop is used to iterate over the data.game indexes to push them to the relevant destructured nested array depending on the data.game element index.
function createRowsFromGame() {

 data.rows = [[], [], [], []]; // reset
 const [row0, row1, row2, row3] = data.rows;

 for (let j = 0; j < 16; j++) {
  j < 4 && row0.push(data.game[j])
  if (j >= 4 && j < 8) { row1.push(data.game[j]) }
  if (j >= 8 && j < 12) { row2.push(data.game[j]) }
  if (j >= 12 && j < 16) { row3.push(data.game[j]) }
 }
}
Column data
Likewise a nested array could be used for the four columns. When the user plays upward or downwards, we could manipulate each column. After that, send them back to the data.game array.
My function named createColumnsFromGame initally makes data.cols a nested array of 4 empty array objects.
function createColumnsFromGame() {
 data.cols = [[], [], [], []];

 const col_a = [0, 4, 8, 12]
 const col_b = [1, 5, 9, 13]
 const col_c = [2, 6, 10, 14]
 const col_d = [3, 7, 11, 15]
}
Then four array variables contain the data.game index of the columns. See the image below and read the columns top to bottom and compare the data to the 4 arrays.

Now each of the arrays can be looped over to push the data.game value at the index into the relevant nested column array in data.cols.
function createColumnsFromGame() {
 data.cols = [[], [], [], []];

 const col_a = [0, 4, 8, 12]
 const col_b = [1, 5, 9, 13]
 const col_c = [2, 6, 10, 14]
 const col_d = [3, 7, 11, 15]

// forEach loops added below

 col_a.forEach((el) => {
  data.cols[0].push(data.game[el])
 })
 col_b.forEach((el) => {
  data.cols[1].push(data.game[el])
 })
 col_c.forEach((el) => {
  data.cols[2].push(data.game[el])
 })
 col_d.forEach((el) => {
  data.cols[3].push(data.game[el])
 })
}
Recap so far
I hope that is clear so far. Let’s recap what we have accomplished.
- The _data.game array controls what is displayed in the browser.
- We created the 4x4 grid display with the showGame function.
- The data.rows array captures the values from data.game for the 4 rows.
- The data.cols array captures the values from data.game for the 4 columns.
What next?
So far so good. My thinking is that we need to figure how to pass the row and column values back to the data.game array. Only then we can work out how to manipulate the rows and columns when the used plays left, right, up or down.
We need to consider how to pass nested arrays to a non-nested array without compromising the data within.
Passing row data back to the game array
I am a firm believer of trying to keep my code readable for other developers. In this instance I chose to destructure the data.rows nested array, then spread each nest into data.game. It is important however, empty the data.game array before passing in the fresh values.
function sendRowsBackToGame() {
 data.game.length = 0;
 const [row0, row1, row2, row3] = data.rows;
 data.game = [...row0, ...row1, ...row2, ...row3]
}
Passing column data back to game array
I must admit to getting stuck at this point and I closed VS code down more times than I care to admit. But perseverance pays and I had the ‘Yaaay’ moment 🚀.
Let’s look at the problem first. Here is a representaion of the nested columns. The numbers represent which data.game index we need to pass the real data back to.
[
[0, 4, 8, 12]
[1, 5, 9, 13]
[2, 6, 10, 14]
[3, 7, 11, 15]
]
Here my Yaay function:
function sendColumnsBackToGame() {
 data.game.length = 0;
 for (let i = 0; i < data.cols.length; i++) {
  for (let j = 0; j < 4; j++) {
   // epiphany moment with j before i
  data.game.push(data.cols[j][i])
  }
 }
}
Recap of what is working
- The _data.game array controls what is displayed in the browser.
- We created the 4x4 grid display with the showGame function.
- The data.rows array captures the values from data.game for the 4 rows.
- We can pass the row data back to the orginal array.
- The data.cols array captures the values from data.game as for the 4 columns.
- We can pass the column data back to the orginal array.
What next?
Now the data can be passed back and forth, we need to consider how to:
- change the row data when the user plays to the left or right.
- change the column data when the user plays up or down.
Play to left ⬅️
Consider the following row data.
[0, 2, 0, 2]If the user plays to the left, the resulting row data we want is:
[4, 0, 0, 0]So how is this done? In two steps. First we need to have all the zeros (0) on the right of the array. On then we need to double up and adjacent matching elements, remove one of them and add a zero the end of the array.
Step 1 - send zeros to the right
The following function takes is the row data as an argument and loops the elements. If an element value equals 0, it is spliced (removed from the array), then a replacement 0 is added to the end of the array using the push( ) method.
function zerosToRight(arr) {
 for (let i = arr.length - 1; i >= 0; i--) {
  if (arr[i] === 0) {
   arr.splice(i, 1)
   arr.push(0)
  }
 }
}
Loop by loop this will happen:
// start
[0, 2, 0, 2]
// then
[2, 0, 2, 0]
// then
[2, 2, 0, 0]
But this only works on a single array, not a nested one. Therefore a second another function calls zerosToRight on each of the nested arrays in data.rows.
function nestedZerosToRight(arr) {
 for (let i = 0; i < arr.length; i++) {
  zerosToRight(arr[i])
 }
}
So far we have accomplished all zeros on the right, the next step is double up any adjacent elements.
My doubleNumbersOnLeft function loops an array and if an element matches the next element:
- the first element is doubled
- the second elemnt is spliced out of the array
- a zero is pushed to the end of the array
function doubleNumbersOnLeft(arr) {
 for (let i = 0; i < arr.length; i++) {
  if (arr[i] === arr[i + 1]) {
   arr[i] = arr[i] * 2;
   arr.splice([i + 1], 1)
   arr.push(0)
  }
 }
}
const example = [8, 8, 0, 0];
doubleNumbersOnLeft(example)
// example is now [16, 0, 0, 0]This function loops a single array, not nested arrays. Therefore to apply the function to the nested data.rows array. The nestedDoubleNumbersOnLeft function with data.rows as an argument double up the numbers in each nested array.
function nestedDoubleNumbersOnLeft(arr) {
 for (let i = 0; i < arr.length; i++) {
  doubleNumbersOnLeft(arr[i])
 }
}
Play to right
Rather than writing a bunch more code, perhaps we can use the functions already written. Afterall we need something similar to happen.
// start
[0, 2, 0, 2]
// play to left
// zeros to the right
[2, 2, 0, 0]
// double number on left
[4, 0, 0, 0]

// or play to right
[0, 2, 0, 2]
// zeros to the left
[0, 0, 2, 2]
// double number on left
[0, 0, 0, 4]
A new but similar zerosToLeft function takes in the array, reverses it with the reverse( ) method. The same code for zerosToRight is used before reversing the array back to its original form.
function zerosToLeft(arr) {
 arr.reverse()
 for (let i = arr.length - 1; i >= 0; i--) {
  if (arr[i] === 0) {
   arr.splice(i, 1)
   arr.push(0)
  }
 }
 arr.reverse()
}
This function could be refactored like so:
function zerosToLeft(arr) {
 arr.reverse()
 zerosToRight(arr)
 arr.reverse()
}
This only works on a single array, not a nested one. Therefore a another function calls zerosToLeft on each of the nested arrays in data.rows.
function nestedZerosToLeft(arr) {
 for (let i = 0; i < arr.length; i++) {
  zerosToLeft(arr[i])
 }
}
The same approach can be taken when doubling the values to the right of the array.
function doubleNumbersOnRight(arr) {
 for (let i = 0; i < arr.length; i++) {
  arr.reverse()
  if (arr[i] === arr[i + 1]) {
   arr[i] = arr[i] * 2;
   arr.splice([i + 1], 1)
   arr.push(0)
  }
  arr.reverse()
 }
}
Then the nested array data.rows is looped
function nestedDoubleNumbersOnRight(arr) {
 for (let i = 0; i < arr.length; i++) {
  doubleNumbersOnRight(arr[i])
 }
}
Recap of what is working
- The _data.game array controls what is displayed in the browser.
- We created the 4x4 grid display with the showGame function.
- The data.rows array captures the values from data.game for the 4 rows.
- We can pass the row data back to the orginal array.
- The data.cols array captures the values from data.game as for the 4 columns.
- We can pass the column data back to the orginal array.
- Change the row data when the user plays to the left or right.
Play upwards
You will remember that the createColumnsFromGame function took the data.game element values and added them to data.cols as four nested arrays. It is these nested arrays that we need to manipulate when the user plays upward or downward.
If we consider the nested data.cols[0] (the first of the nested arrays), it will contain the values of data.game[0], data.game[4], data.game[8] and data.game[12] in that order.
[0, 4, 8, 12] // data.game indexesThe values might look like this:
[0, 2, 2, 4] // data.game index valuesSo to play upwards, we need to move any zeros (0) to the end of the array and double any matching adjacent values. We have done this already! Therefore we can reuse the nestedZerosToRight and nestedDoubleNumbersOnLeft functions by passing the data.cols array in as the argument. For example, nestedZerosToRight(data.cols).
We will see the order of calling these functions a bit later.
Play downwards
Similarly, to play downward we need to move any zeros (0) to the beginning of the array and double any matching adjacent values at the end. We have done this already with play to the left. Therefore we can reuse the nestedZerosToLeft and nestedDoubleNumbersOnRight functions and pass the data.cols array in as the argument.
Recap of what is working
- The _data.game array controls what is displayed in the browser.
- We created the 4x4 grid display with the showGame function.
- The data.rows array captures the values from data.game for the 4 rows.
- We can pass the row data back to the orginal array.
- The data.cols array captures the values from data.game as for the 4 columns.
- We can pass the column data back to the orginal array.
- Change the row data when the user plays to the left or right.
- Change the column data when the user plays to the up or down.
The final feature - add new number 2
Before we create the user functionality there is one more thing to do. That is to add a new number 2 to the grid after each move. But it can’t just go anywhere on the grid. It must go in an empty grid square, or in the code a data.game index with a value of zero (0).
First, we empty the data.spaces array, then loop the data.game array looking for elements that equal 0 and push the index of a match to data.spaces.
function findSpaceOnBoard(arr) {
 data.spaces.length = 0;
 for (let i = 0; i < arr.length; i++) {
  if (arr[i] === 0) {
   data.spaces.push(i)
  }
 }
}
Now we know where the empty grid squares are, we can get a random one and pass it as a number two into the data.game array. To make this function work, data.spaces is passed as the argument arr.
function fillRandomSpace(arr) {
 if (arr.length > 0) {
  let randomSpace = Math.floor(Math.random() * arr.length);
  data.game[arr[randomSpace]] = 2
 }
}
To keep the code tidy the two functions above are placed into one to be called at the end of each turn.
function addNumberAfterPlay() {
 findSpaceOnBoard(data.game)
 fillRandomSpace(data.spaces)
}
Event listeners
We are ready to hook up our code with event listners that will respond to user actions. The code below listens for the keyboard’s up, right, left and down keys to be pressed. You could add 4 buttons to the user interface for use on mobile devices.
At the end of my code addEventListener is on the window object. This listens for the KeyboardEvent.code.
window.addEventListener("keydown", function (e) {
 if (e.code === 'ArrowLeft') {
  playToLeft()
 }
 if (e.code === 'ArrowRight') {
  playToRight()
 }
 if (e.code === 'ArrowDown') {
  playDownwards()
 }
 if (e.code === 'ArrowUp') {
  playUpwards()
 }
 e.preventDefault();
});

showGame()
Now the play functions can be added. You will see that they are all subtly different and based on the functions written above.
Play left
function playToLeft() {
 createRowsFromGame()
 nestedZerosToRight(data.rows)
 nestedDoubleNumbersOnLeft(data.rows)
 sendRowsBackToGame()
 addNumberAfterPlay()
 showGame()
}
Play right
function playToRight() {
 createRowsFromGame()
 nestedZerosToLeft(data.rows)
 nestedDoubleNumbersOnRight(data.rows)
 sendRowsBackToGame()
 addNumberAfterPlay()
 showGame()
}
Play upward
function playUpwards() {
 createColumnsFromGame()
 nestedZerosToRight(data.cols)
 nestedDoubleNumbersOnLeft(data.cols)
 sendColumnsBackToGame()
 addNumberAfterPlay()
 showGame()
}
Play downward
function playUpwards() {
 createColumnsFromGame()
 nestedZerosToLeft(data.cols)
 nestedDoubleNumbersOnRight(data.cols)
 sendColumnsBackToGame()
 addNumberAfterPlay()
 showGame()
}
Recap of what is working
- The _data.game array controls what is displayed in the browser.
- We created the 4x4 grid display with the showGame function.
- The data.rows array captures the values from data.game for the 4 rows.
- We can pass the row data back to the orginal array.
- The data.cols array captures the values from data.game as for the 4 columns.
- We can pass the column data back to the orginal array.
- Change the row data when the user plays to the left or right.
- Change the column data when the user plays to the up or down.
- Add a new number 2 in a random clear spaces
- Add the event listener for each arrow key on the keyboard
- Create a multi-function function to be called on each key event.

That’s it. If you got to the end of this post, thank you for your perseverance. There may be a couple of more features you’d like to add to your game. Such as a color scheme, a win / lose notification, a game reset, perhaps scoring too. Make the game your own! In the meantime, here is my take on the 2048 game.
Thank you for stumbling across this website and for reading my blog post entitled Rethinking 2048.